Chọt cái này cũng hay JSON Web Tokens (JWT)
30th Jun 2022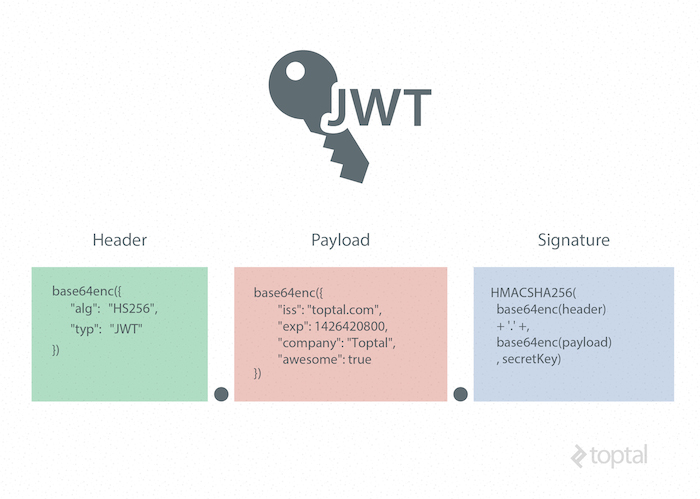


JSON Web Tokens (JWT) are an open, industry-standard RFC 7519 to represent a set of information securely between two parties. JWTs are commonly used for authentication to routes, services, and resources and are digitally signed, which enables secure transmission of information that is verified and trusted. Seen as a more modern approach to authentication, JWTs serve as a robust alternative to traditional authentication models - eliminating the need to pass sessions or credentials repeatedly to the server.
In this post, I outline the benefits of JWTs and its advantages over session-based authentication. I also share a step-by-step guide to setting up JWT authentication in Drupal 8 for authenticating requests to protected core REST resources.
The JWT Structure
A JWT contains 3 parts:
- Header - typically contains the type of the token (i.e., “JWT”) and the hashing algorithm being used (i.e., “HS256”, “HS512”). This information is Base64Url-encoded.
- Payload - contains the “claims”, which are statements with information about an entity (such as the user) and other types of metadata. This information is Base64Url-encoded.
- Signature - used to check the authenticity of the JWT. It is generated by using the hashing algorithm specified in the header to hash the “header”, “payload”, and a secret key. The signature is crucial in verifying that the sender of the JWT is legitimate and that the message has not been tampered with along the way during transmission. If the message has been tampered with, the signature will not match because it was generated from the original payload data and will be invalid - failing the authentication.
Example of a JWT:

Main Advantages
- Compact - the small overhead allows for the quick transmission of information. Because of this, it can be quickly sent through an URL, POST parameter, or in an HTTP header.
- Self-contained - All required information about the user or client are contained in the JWT’s “payload” - which reduces database queries.
- Works with CORS - token-based authentication allows for calls to any server by transmitting user information through the HTTP header.
JWT vs Session-based authentication
- JWT do not require session data to be kept on the server to perform authentication. For applications running on multiple servers, this alleviates the need for sharing session data across the servers.
- JWT carry their own expiry date (in the “payload”) and do not require garbage collection as is needed when expiring sessions.
- JWT allows for true RESTful services as the communication between the parties is stateless - requiring a valid token to be included in each request.
- The JWT can easily be sent with each request and contains all the information about the user/client - eliminating the need to reference the database to get the information.
Authentication Workflow
- Client logs in (or requests a JWT directly from the provider).
- A digitally-signed JWT is created with the secret key.
- A JWT is returned that contains information about the client. This JWT should be stored client-side like in localStorage.
- On each request, the JWT should be sent in the “Authorization” header (where <token>is the JWT): Authorization: Bearer <token>
- The JWT is verified and validated. If the JWT has expired, a new one should be requested.
- If validated, the response gets returned to the client.
Setting Up in Drupal 8
We will go through the process of setting up JWT in Drupal 8 to authenticate some core REST resources
Install and enable the JWT module
The JWT module provides an authentication provider that uses JWTs that we can enable for our REST endpoints. It has a dependency on the Key module which should also be enabled. The firebase/php-jwt package library will be included for encoding and decoding the JWTs.
The module can easily be installed with composer:
composer require drupal/jwt;
Enable the module:
drush en jwt -y;
We also want to enable the “JWT Auth Consumer” and “JWT Auth Issuer” modules that come with the JWT module (these modules will allow Drupal to issue and consume JWTs):
drush en jwt_auth_consumer jwt_auth_issuer -y;
Create a secret key
To generate and validate JWTs, a secret key is needed. Go to /admin/config/system/keys/add (or the “Configuration” page and click “Keys”).On the form:
- “Key name” - the name of the key.
- “Key type” - select “JWT HMAC Key”. We will be using HMAC.
- “JWT Algorithm” - select “HMAC using SHA-512 (HS512)”. Any other algorithms will also work.
- “Key value” - provide a key with a length that satisfies the hashing algorithm chosen in “JWT Algorithm”. In our case, we need to provide a key that is a minimum of 1024 bits.
Use the secret key with JWT
Now, we need to tell the JWT module to use the key we just created as the secret.Go to /admin/config/system/jwt (or the “Configuration” page and click “JWT Authentication”).Under “Algorithm”, select the algorithm that was set for your secret key. In our case, it will be “HMAC using SHA-512 (HS512)”.Under “Secret”, choose the secret key you created.
Save the configuration.
Install and enable the REST and REST UI modules
In this example, we will be applying JWT authentication to a core REST resource, so we need to make sure the REST module and our resource are enabled:
Install the REST UI module:
composer require drupal/restui;
Enable the modules:
drush en rest -y;\ndrush en restui -y;
Configure our REST resource
Go to /admin/config/services/rest and enable the “Content” resource:
Click “Edit” on the “Content” resource.
Enable the “GET” method, check the “json” option under “Accepted request formats”, and “jwt_auth” under “Authentication providers”:
Save the configuration.As of Drupal 8.2.0, accessing entities via REST no longer requires REST-specific permissions. As a result, whether or not a user has access to an entity via REST depends on their permissions to access that entity. For the sake of our example, let’s prevent anonymous users from accessing any published content, which also restricts them from accessing those entities via REST:
Usage
Creating a piece of test content
We will create and publish a test “article” node for which we will be accessing its JSON output via REST. You can create any node you’d like. Once created, the JSON output for that node can be viewed by accessing /node/1?_format=json).
Accessing our protected resource
Now that our REST resource has been configured to use JWT Auth and anonymous users are restricted from accessing entities via REST, it’s time to test out the JWT authentication.
Open your favorite REST client like Postman and enter the URL for the node’s JSON output (i.e., /node/1?_format=json). Using the GET method, hit “Send”. The response will be empty because we are trying to access this resource as an anonymous user (and we prevented anonymous users from accessing published nodes for this example):
Since our REST resource is protected with JWT Authentication, we need to pass in a JWT to authenticate us. Logged in as an “administrator” user, visit /jwt/token to retrieve a JWT. You should see the JWT displayed when you visit that route:
Copy this entire token and add an “Authorization” header in your REST client with a value of “Bearer <token>” where <token> is the JWT:
Hit “Send” again and voilà - a response is returned:
How did this work?
Let’s discuss what’s happened here.The JWT module provides 3 events -- VALIDATE, VALID, and GENERATE -- which are dispatched by the event dispatcher. Custom validations and logic can be incorporated by creating your own event subscribers that subscribes to these events (more information about the events can be found in JwtAuthEvents.php).
The VALID event fires after the token has been validated (in other words, the JWT signature is verified as legitimate). The user is then loaded from the “uid” that is specified in the JWT “payload” (see loadUser() in JwtAuthConsumerSubscriber.php). Note that if no “uid” is in the payload, the user is “anonymous”. The JWT Authentication provider (JwtAuth.php) has an authenticate() method that validates this user and if the validation succeeds, that user will be able to access the REST resource. Because the JWT passed into the request’s header contains the “uid” of the “administrator” user -- and provided that administrators are able to access this resource -- the response is returned successfully.
Notes
We can also use the JWT Debugger to analyze any JWT tokens. If we paste our JWT in the debugger and put in our secret key, we can see a confirmation that our signature has been verified. We can also see that the JWT “payload” contains the administrator user’s uid and the expiration timestamp:


Add new comment